Note: Please read the article carefully before proceeding! If in the process of using you encounter any errors, such as broken download links, slow loading blog, or unable to access a certain page on the blog ... then please inform me here. Thanks!
Windows 7 is an extremely successful version of Windows operating system with Microsoft, until 2020 when it is about to be dead, there are still many people who trust to use.However, in my opinion, because of security, you should not continue to use Windows 7, but should upgrade to Windows 10 to use, because there will be many security holes because they are no longer updated by Microsoft. again.
Recently, Microsoft announced that Windows 7 was officially killed on January 14, 2020 and required to upgrade to Windows 10. If you do not know how to create a USB to install Windows to install a new Windows, then be assured, in the article. I would like to share with you how to upgrade from Windows 7 to Windows with just a few lines of command!
Read more:
#first. What are the conditions for upgrading?
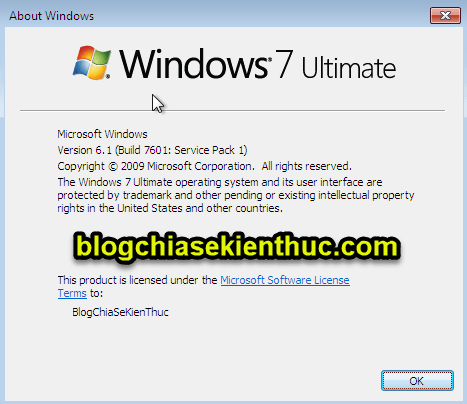
Note : This command is only compatible with Windows 7 Service Pack 1 (SP1), so if it is not the correct version, download and install the SP1 update package. here.
You can check the version and Version that Windows is using by pressing the key combination
Windows + R to open the Run dialog box => enter the command winver => and press Enter.Read more: How to check the current Windows version information (Version, Build ..)
If you encounter error check update on Windows 7, you can refer to the article to fix check update error for Windows 7!
#2. Upgrade Windows 7 to Windows 10 for free
+ Step 1: First, click on the Windows button on the keyboard or click on the Windows icon on the Taskbar => then enter the keyword search boxpowershell => right click Windows Powershell => and select Run as Administrator to run with administrator privileges.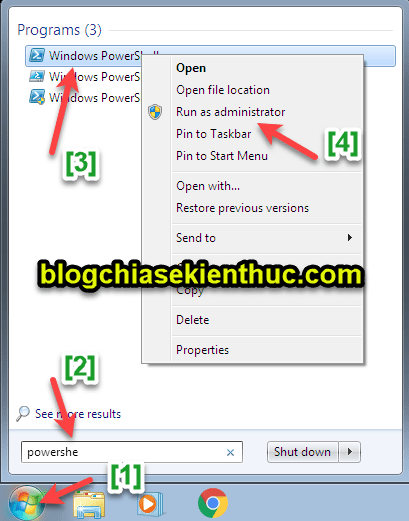
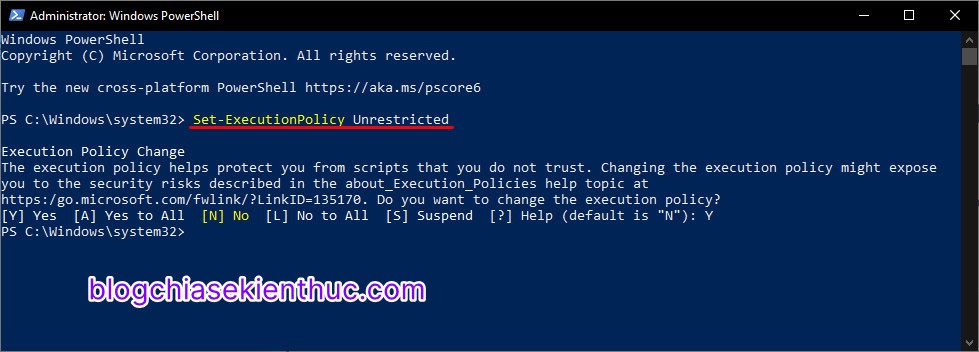
+ Step 2: Next, enter the command below
Windows Powershell => and then press the key Enter, when asked for confirmation Execution Policy Change then enter the word Y to agree is done.Set-ExecutionPolicy Unrestricted
+ Step 3: Not done yet, now there are 2 options for you to choose. One is to download the file I created available just run, 2 is to create the file to run.
+ Case 1: Download the ready-made file here or here !
+ Case 2: Manually create files manually.
You open Windows Run (combination
Windows + R) => then enter notepad => and press OK to open a new TXT file in Notepad.=> Then paste the following commands into Notepad and use the key combination
CTRL + S to save this file.$dir = "c:temp" mkdir $dir $webClient = New-Object System.Net.WebClient $url = "https://go.microsoft.com/fwlink/?LinkID=799445" $file = "$($dir)Win10Upgrade.exe" $webClient.DownloadFile($url,$file) Start-Process -FilePath $file -ArgumentList "/quietinstall /skipeula /auto upgrade /copylogs $dir" -verb runas
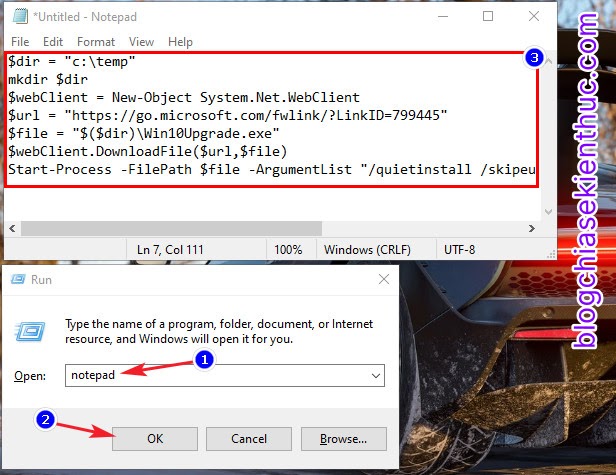
Please save this file as
upgrade.ps1, or another name is fine but must be a tail .ps1 to run on PowerShell of Windows okay.By default, Notepad will save the file as
.TXT, to change to your own tail - here is the extension ps1 in the file storage interface as shown below, you just need to change Save as type from >Text documents (*.txt)All Files (. *) => and then press Save is done.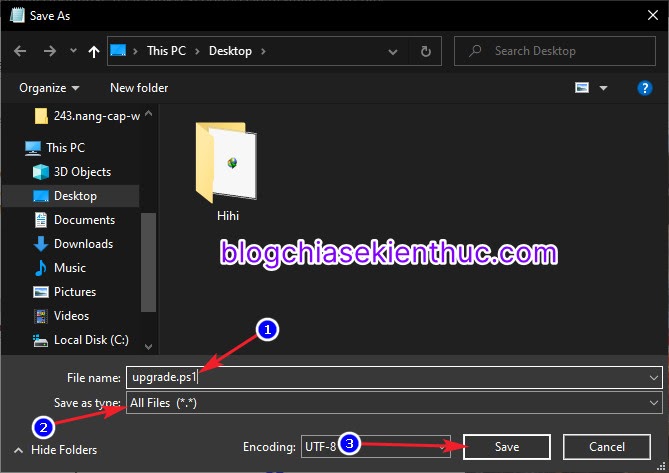
+ Step 4: After having the file
upgrade.ps1 Then, just right-click on the file => and select Run with PowerShell it works, but double-clicking on it won't do anything!
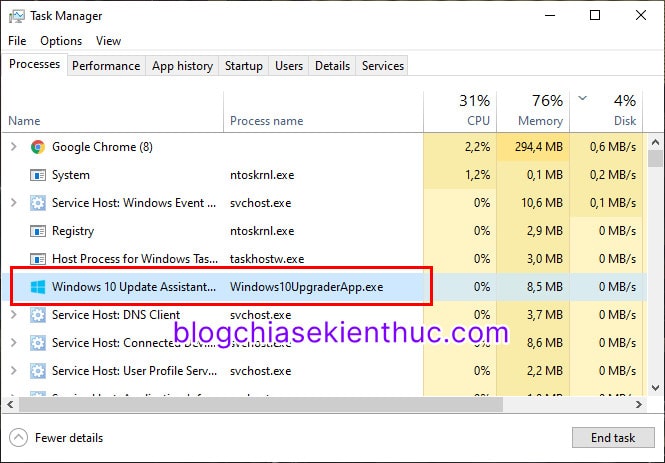
+ Step 5: A Windows PowerShell window will appear, but you don't need to care what it does.
Now, open Task Manager with the key combination
Ctrl + Shift + Esc => switch to tab Process, look in the list of processes named Windows10UpgradeApp.exe, if any OK and know.Now just wait or continue working as usual until the update is complete 😛
+ Step 6: After the update process has completed, you will see a terms of use appear as shown below => click on
Accept And after that Next A few more, and you have access to Windows 10 - a new horizon !!!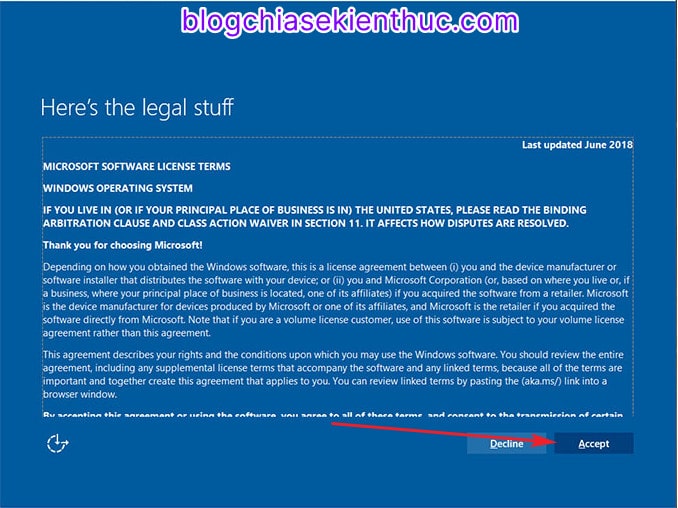
You may need: Instructions on how to install Windows 10 (32bit and 64bit) the most detailed
Note: Before upgrading, you should also be prepared psychologically likely to be defective, because not 100% of the computers will upgrade successfully, there is still an error rate during the update process anyway. again.
Therefore, if you do not upgrade successfully, then you know what to do: What to do before reinstalling Windows or Ghost computer?
Therefore, if you do not upgrade successfully, then you know what to do: What to do before reinstalling Windows or Ghost computer?
# 3. Epilogue
So I just introduced you one more way upgrade Windows 7 to Windows 10 with the command in Windows PowerShell then ha.Hopefully, through this article, you will be able to update yourself to Windows 10 without resorting to anyone or spending hundreds of thousands more workers.
Good luck !
CTV: Nguyen Thanh Tung -
Note: Was this article helpful to you? Do not forget to rate the article, like and share it with your friends and relatives!


")
 Haven't Tried")


Post a Comment
Post a Comment