In this article, you will learn how to install SSL certificates on CentOS 7.
Usually, common, normal, ecommerce or online financial services need this protocol because they often store sensitive information, such as credit cards.
However, SSL certificates have now become the common standard for all websites, to protect users’ confidential data, such as login information, social security numbers, identity cards, etc.
Luckily you can get SSL certificates easily from vendors like COMODO SSL and Let's Encrypt, will be used in our installation guide.
Install Apache manually
Before installing SSL, make sure that Apache (web server software) installed on your CentOS.You can check the installation or not easily by typing httpd -v when server access through SSH. If Apache is installed, you will see results similar to the results below.
On Hostinger, users can choose to pre-install Apache on their servers.

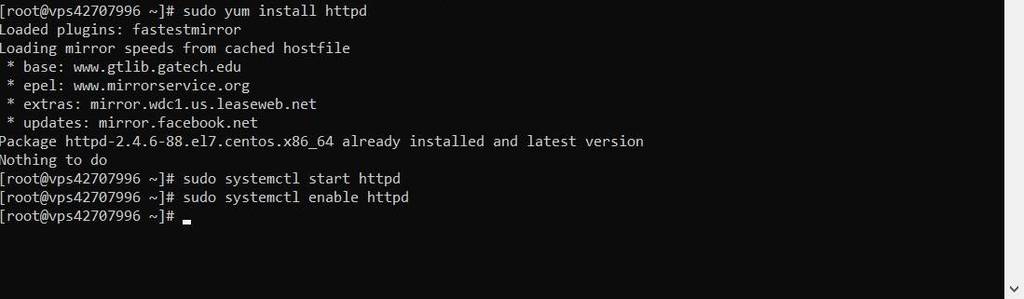
On CentOS 7, Apache can be installed via the software repository by entering this command in a terminal:
sudo yum install httpd
Now to start using Apache, enter:sudo systemctl start httpd
If you want Apache to start automatically at start-up, enable it with:sudo systemctl enable httpd
How to install SSL Let’s's Encrypt
Let's Encrypt offers a free SSL certificate. Let’s see how to install it on the server.
Important: We use “host hostinger-dev-9.xyz"As a test site, but you must replace it with the name of your site.
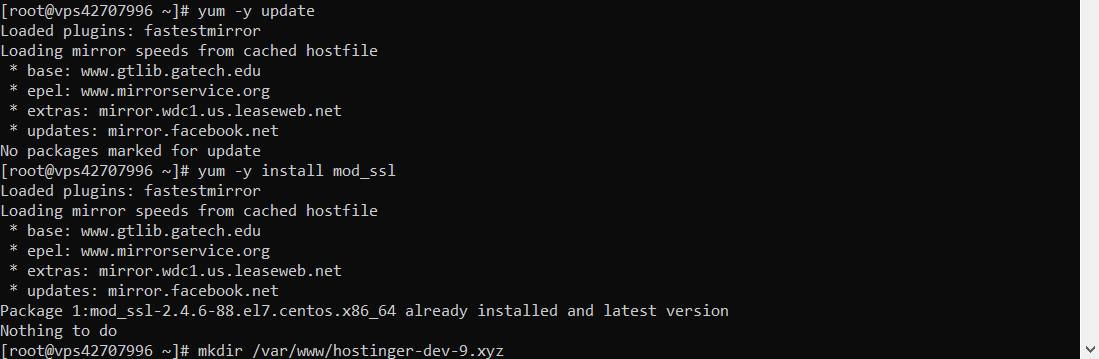
We recommend that you update the system first to ensure safety.yum -y update
Next, you will need mod_ssl to configure Let's Encrypt.yum -y install mod_ssl
Now, configure Apache by creating a root document directory for the site.mkdir /var/www/hostinger-dev-9.xyz
The virtual host config file is required in this step. You can create it with nano and enter the following lines:
nano /etc/httpd/conf.d/hostinger-dev-9.xyz.conf
In nano, enter the code:Replace owner of the directory /var/www/hostinger-dev-9.xyz by using your apache user so it can recognize the directoryServerAdmin admin@test.com DocumentRoot "/var/www/hostinger-dev-9.xyz" ServerName hostinger-dev-9.xyz ServerAlias www.hostinger-dev-9.xyz.com ErrorLog "/var/log/httpd/test.error_log" CustomLog "/var/log/httpd/test.access_log" common
chown -R apache:apache /var/www/hostinger-dev-9.xyz
Install Certbot
Before installing certbot, make sure you have activated EPEL repository by entering this command:yum -y install epel-release
Next is the installation yum-utilsyum -y install yum-utils
Only then can you install certbot for Apacheyum -y install certbot-apache

After installing certbot, run it by executing:
certbot
There will be a prompt asking for the name you want to activate https on:Saving debug log to /var/log/letsencrypt/letsencrypt.log Plugins selected: Authenticator apache, Installer apacheStarting new HTTPS connection (1): acme-v01.api.letsencrypt.org Which names would you like to activate HTTPS for? ------------------------------------------------------------------------------- 1: hostinger-dev-9.xyz 2: www.hostinger-dev-9.xyz ------------------------------------------------------------------------------- Select the appropriate numbers separated by commas and/or spaces, or leave input blank to select all options shown (Enter 'c' to cancel):
Just press enter for both hostinger-dev-9.xyz and www.hostinger-dev-9.xyz be redirected to httpsAnother prompt will appear:
Choose whether or not to redirect HTTP traffic to HTTPS, removing HTTP access. ------------------------------------------------------------------------------- 1: No redirect – Make no further changes to the web server configuration. 2: Redirect – Make all requests redirect to secure HTTPS access. Choose this for new sites, or if you're confident your site works on HTTPS. You can undo this change by editing your web server's configuration. ------------------------------------------------------------------------------- Select the appropriate number [1-2] then [enter] (press 'c' to cancel):
Choose No. 2 to redirect your site name to https as well.You should see the output below if the process is done correctly ------------------------------------------------------------------------------- Congratulations! You have successfully enabled https://hostinger-dev-9.xyz and https://www.hostinger-dev-9.xyz You should test your configuration at: https://www.ssllabs.com/ssltest/analyze.html?d=hostinger-dev-9.xyz https://www.ssllabs.com/ssltest/analyze.html?d=www.hostinger-dev-9.xyz -------------------------------------------------------------------------------
Renew the certificate automatically
A good thing when using Let's Encrypt is that you can set up automatic certificate renewal.To set automatic renewal, enter the following command:
export EDITOR=/bin/nano
This command will set nano as the default editor and it is now editable crontab:crontab -e
In fact, Let's Encrypt recommends that auto-renew cronjob will run twice a day. To do so, paste this command and save crontab:* */12 * * * /usr/bin/certbot renew >/dev/null 2>&1
How to install SSL certificate with Comodo
COMODO SSL is a provider of paid SSL certificates. With this provider, users can choose to encrypt server traffic. Here’s how to install on CentOS 7.Download Intermediate Certificate (ComodoRSACA.crt) and Primary Certificate (domain_name.crt) and copy to server directory. It will store your certificate and main files.
grep -i -r "SSLCertificateFile" /etc/httpd/
Search for the file config Apache. Typically, the file name is httpd.conf or apache2.conf. The usual locations for the file are / etc / httpd / or / etc / apache2 /. If it can’t be found, the alternative is to search using grep via the command below:grep -i -r "SSLCertificateFile" /etc/httpd/
Note: change “/ etc / httpd /"Into the base directory of the Apache installation
Now, if you want to enable SSL on the server, configure it with DocumentRoot /var/www/hostinger-dev-9.xyz ServerName www.hostinger-dev-9.xyz SSLEngine on SSLCertificateFile /var/www/hostinger-dev-9.xyz.crt SSLCertificateKeyFile /var/www/your_private.key SSLCertificateChainFile /var/www/ComodoCA.crt
- 31,220.62,130 : change this to your server’s IP address
- SSLCertificateFile need to change to your COMODO certificate file (eg. domain_name.crt)
- SSLCertificateKeyFile Key file is generated when you create CSR (Certificate Signing Request)
- SSLCertificateChainFile is the intermedia file COMODO certificate (ComodoRSACA.crt)
apachectl configtest
After all is correct, restart Apache with SSL support:apachectl stop
And after thatapachectl start

In case Apache doesn’t start with SSL support, use “apachectl startssl” instead.
Summary
SSL is required to ensure traffic on your site, especially if used to process transactions. COMODO SSL and Let's Encrypt are the two providers that allow you to install SSL certificates on CentOS 7. Although installing one of these 2 certificates can be difficult, it is well worth it. Make your website more secure


")
 Haven't Tried")


Post a Comment
Post a Comment