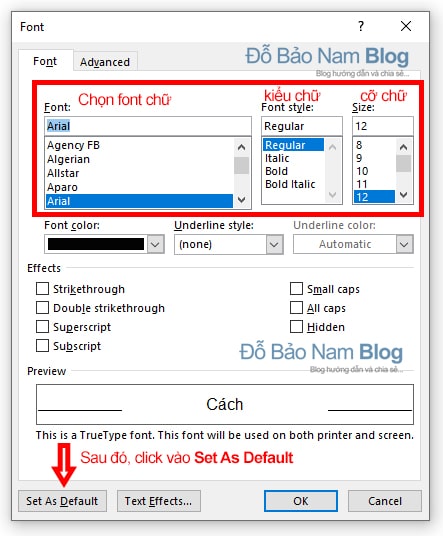
If you feel bothered each time use Word, you have to reset the font for the text? Do you know that you can Set the default font in Word at will? This is very simple. You can change the default default font with the font you often use. It could be Time New Roman, or Arial, or VnTime … depending on you. And on different versions of Word, this is exactly the same. So, whether you set the default font for Word 2013, or 2016, 2019 …, the steps are the same. Particularly for older versions of Word, such as 2010, 2007 …, the software interface is a bit different. But basically, the default font setting for Word 2010 is similar to the newer versions. For a quick look at how to set default fonts in Word, Do Bao Nam Blog has prepared a very detailed tutorial video. In this video, Do Bao Nam Blog shares very quickly and briefly. The video is only over 2 minutes long, but it is very useful information. Invite you to watch the content of the video below: As the information above on Do Bao Nam Blog shared, installing fonts on different versions of Word is exactly the same. Therefore, the steps below will apply to all versions. And the picture illustrates the steps too. You just need to follow the steps below: Step 1: From the Word software interface, press the key combination Ctrl + Shift + F. Using this shortcut will be fast, and apply on all different versions. Alternatively, if you don’t want to use keyboard shortcuts, in the Home tab, you can click the small arrow in the Font group. (This step has no artwork, just press the key combination above). Step 2: When the Font dialog box appears, select the Home tab. In this tab, you will see a number of boxes including Font, Font style, and size … These are the information you need to set for your default font to display. After you have set the default font, type, and font size, click Set As Default. Then, a small dialog box appears, click All documents based on the Normal.dotm template and choose OK, got it. In some cases when you download a document from another source, and you find that the word document has font errors. In this case, the original editor used the font that your computer does not have. These may be uncommon fonts, or because your computer has few fonts and has not installed some necessary fonts. Therefore, when Change the default font in Word, you should choose commonly used fonts. These can be Time New Roman, Arial fonts, etc. These are the most frequently used fonts. And when switching to other computers, you always feel secure because every machine has this font. Also, you should not install strange fonts, because sometimes they often have font errors. In addition, if you do not know how to install fonts for your computer, or you need to download more beautiful fonts, art fonts, etc., you can download directly at the following address: https://dobaonamblog.com/tin-hoc/thu-thuat-may-tinh/huong-dan-cach-cai-dat-font-chu-cho-may-tinh-windows/ At this link, Do Bao Nam Blog shared a lot about how to install fonts for the computer, and a link to download full fonts needed for the computer. The article How to set the default font in Word fastest appeared first on Do Bao Nam Blog.Video sharing how to set a default font in Word
Instructions on how to set the default font in Word
What font should be the default font in Word?


")
 Haven't Tried")


Post a Comment
Post a Comment