
This article will guide you to point your domain name to your hosting, along with basic DNS management instructions. If you still do not understand what a domain name is, or what DNS is, you can read more this article to understand the basic concepts before starting to point domain names.
Method 1 – Point domain to hosting by editing nameservers
If you already have a domain name from another registrar and want to point it to Hostinger's host, you can use this article to see how to quickly point a domain to Hostinger. Usually domain names purchased at Hostinger will have Hostinger's nameservers already in place, and therefore point themselves to hosting on the same account.
If you bought a domain name at Hostinger, and want to point the domain to another hosting. Please follow these steps:
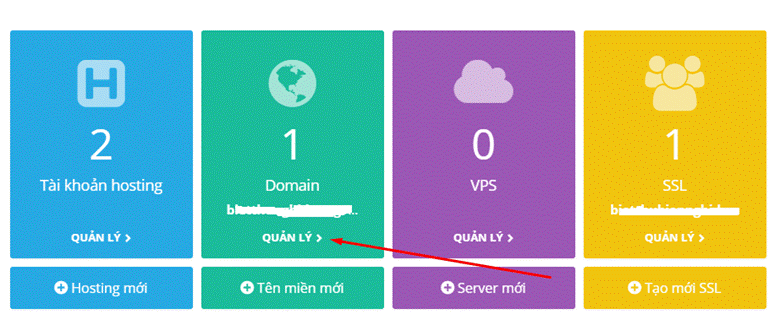
- Log into Control panel at hostinger.vn, select the button Manage in the domain name section or select the menu "Domain” located in the top toolbar.
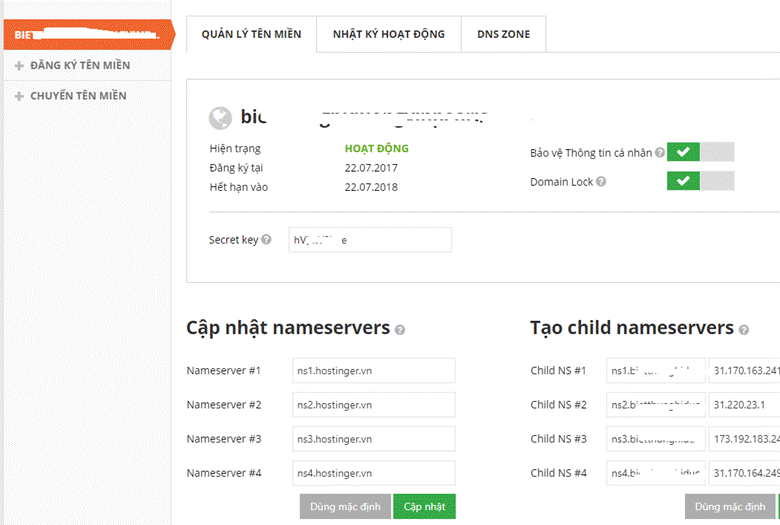
- Change the domain's nameserver in the . section Update Nameservers:
- Press the button Update is to finish saving the nameservers with a different name.
Note, after pointing a domain name or changing DNS information, it may take a few hours to 24 hours for the change to take effect as it takes time for the Internet to propagate your change.
In addition, wherever you point the nameserver of the domain name, edit the DNS records and manage DNS there. If you are setting to another nameserver like CloudFlare's nameserver as shown below:
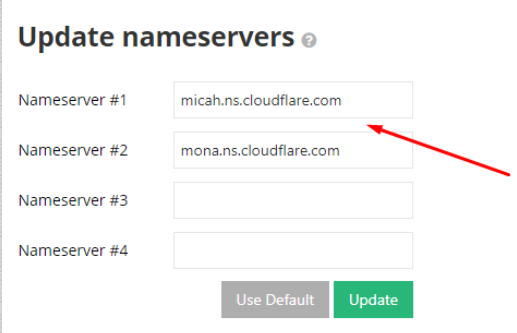
Then to point the domain name, you need to go to the DNS Zone management area in CloudFlare's management interface to point A record and other records.
Method 2 – Point domain to hosting with A record
As an example of editing DNS records, we will guide you through the most common operation in domain name management, which is to point the domain name to hosting with an A record.
We will point the domain from Hostinger next Ladipage, the steps are as follows:
- Go to Hostinger's homepage and select Sign In.

- Then enter customer account information at Hostinger to enter the administration system.
- Find the item domains, select your domain name, press the DNS ZONE button to enter the domain's DNS zone
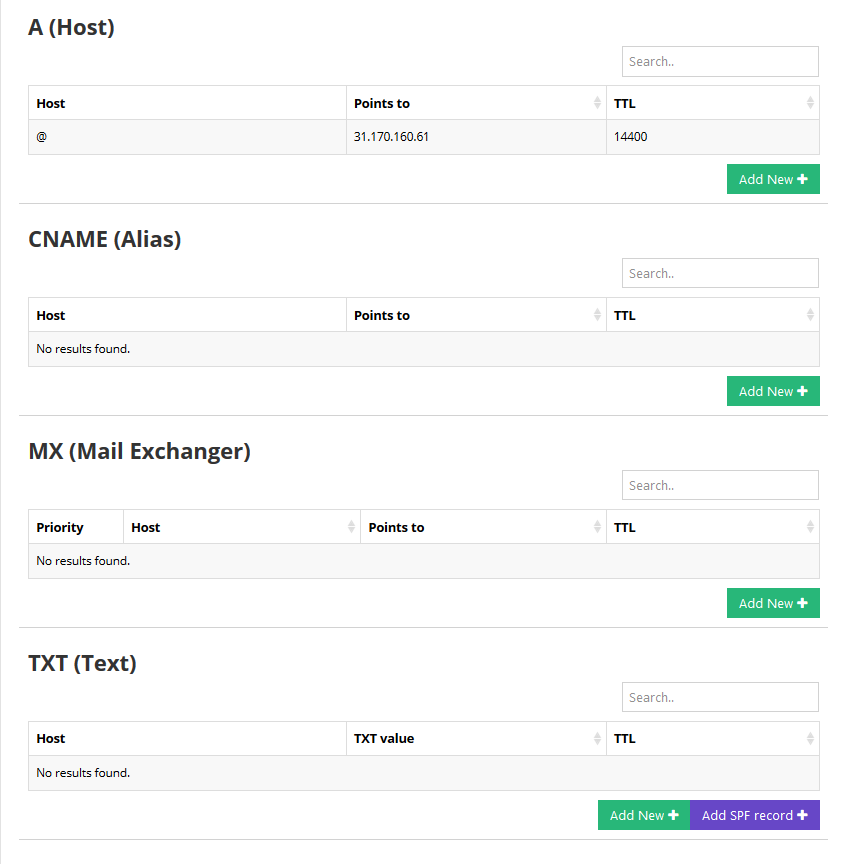
- Add (or change) the following 2 records:
CNAME part: set record Host to bewwwand Points to (points to):dns.ladipage.com
Part A record: set host record as @ Points to: 13.229.38.226 (this address is subject to change, please contact ladipage for exact information)
The result will be similar to the image below: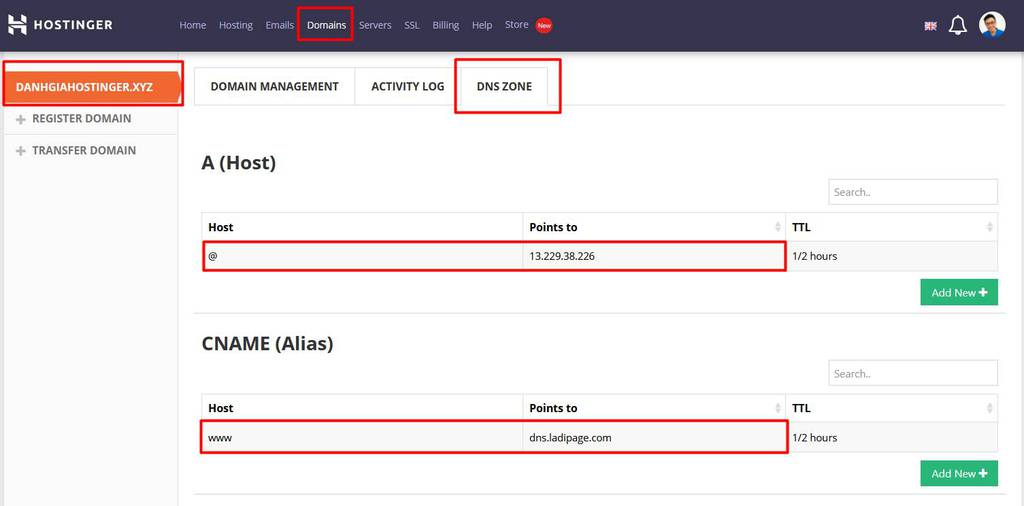
- Then save the information
TTL, stands for Time To Leave, leave the default.
Likewise, for other records, check what service you are using and adjust the DNS record to the correct type of record you need to set up. For example, if you want to point a subdomain (subdomain) to the ladipage, you can do the following:
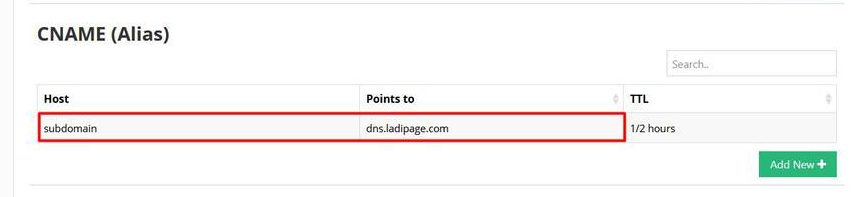
Let's say your main domain is Danhgiahostinger.xyz, and you want to create a subdomain, subdomain.danhgiahostinger.xyz. Select the primary domain you want to install, then create a new record and fill in the values as follows:
In the CNAME area, select the host record: subdomain Points to: dns.ladipage.com
The result will be as follows:
If you want to delete any record, hover over the record you want to delete and press the . button Erase. Before deleting anything, don't forget to save the information to avoid deleting it by mistake or wanting to go back.
That's all, now you know how to point your domain name to your hosting by managing DNS records. To learn more information in the DNS Zone (DNS editing area), read the next section.
Key operations to manage DNS domain names registered at a provider
When you register a domain name at Hostinger, you have full control over it. Common domain name management tasks are:
- Update nameservers
- Tạo child nameservers
- Turn on personal information protection
- Domain Lock/Unlock
- Edit DNS zone
In the Domain Management tab, it will show general information about your domain name such as its status, registration date, expiration date, and the domain's Secret Key security code.
Here you can also easily turn off domain unlocking (Domain Lock) or turn on protection of domain WHOIS information (this section may charge a separate fee if you do not choose to hide information when choosing to buy a domain name). In tab Activity log, Hostinger also lists a log of the actions you've taken in changing DNS, making it easier for you to identify errors so that you can fix them if something goes wrong.
Explain the meanings of Nameserver and DNS zone
In this tutorial, we have guided you Update Nameservers and Edit DNS Zones. They are the most basic operations to point the domain. Also, for your better understanding, we will explain what are Nameservers, what are DNS Zones, and DNS record types.
What is nameserver?
Nameserver contains the DNS records for your domain name. Nameservers are responsible for providing IP addresses for a domain name. It allows you to access the website using the domain name instead of the IP address. By changing the nameserver, you have pointed the domain to a hosting provider.
Usually nameservers will be of the form ns1.[ten-mien-cua-nha-dang-ky-hosting] until ns4.[ten-mien-cua-nha-dang-ky-hosting]. Depending on the provider you will be provided with a minimum of 2 nameservers to use.
What is DNS Zone?
DNS zone is a table containing all DNS records for a particular domain. DNS management is about editing the records in the DNS Zone so that the domain name uses the services that the DNS records specify.
Explain the meaning of DNS records
At the DNS Zone tab, you will be able to edit the information about A Record, CNAME, MX, etc. for your domain name. At the beginning of this section we will briefly explain what they mean. This is the part where you actually edit the DNS record to put the record into action.
As you can see here there are many types of records (DNS records), each of which represents a different service/service. Below we explain what the most important domain records mean.
What is A Record?
A Record (Address Record) is the most basic DNS record. A record is used to match an IP address with a domain name. It is used to point domains and subdomains (subdomains) to an IP address when that address is specified and fixed. A record is usually used for website services
What is MX Record?
The MX Record (Mail Exchange Record) is a record in the DNS Zone that identifies which mail server is responsible for receiving email. For example, if you set a google MX record for your domain, all email sent to that domain will be redirected to Google servers. MX records are commonly used for mail services
What is CNAME?
CNAME (Canonical Name) allows creating alias names (alias) to point to another domain name. Usually we will need to create a CNAM for www, so that the whole domain name of this type, for example www.hostinger.vn, points to the correct hosting location of hostinger.vn's website. Let both www.hostinger.vn and hostinger.vn work as one.
In addition, there are other record types such as IPv6, SRV, CAA, SPF, TXT, etc. We will explain it in more detail in articles about it. Hosting Glossary
Epilogue
The domain management page provides you with all the necessary tools to set the DNS values for your domain name. If you have any difficulty or have unclear issues, please contact us so that the support staff can help you out.
You can refer to the following tutorials for more information:
How to point a domain name to Hostinger?
How to point domain to VPS?
What is a parked domain and how to park a domain on Hostinger
What is a subdomain and how to create a subdomain?

Hai G. is an expert in managing and operating website services. He has many years of experience in VPS, Hosting, technical SEO, CMS. Especially love WordPress and have been using it for over 5 years now. His hobbies are reading, blogging, traveling and mentoring young people to start a business.


")
 Haven't Tried")


Post a Comment
Post a Comment