
There are many powerful PHP frameworks, but many of them, due to the structure of the application, cannot read the source code. This can be a problem if you want to document the application code.
Laravel with Apache is a great solution! This PHP framework efficiently orders and compresses source code. In this tutorial, we will show you how to install Laravel with Apache on Ubuntu 18.04.
Laravel – PHP Framework for Code Lovers
No wonder Laravel is one of the most popular PHP frameworks. It has many unique features that make it one of the best rated options with web developers.
It also has excellent documentation and well-executed source code, which translates to very clean code syntax. Fast, efficient and user-friendly – that's what Laravel is.
Here's how to install Lavarel Ubuntu. This installation uses version 18.04, but can also be used with Ubuntu 16.04.
How to Install Laravel on Ubuntu
Before we begin, you need to SSH into your VPS server. This is Helpful guide can help you make it!
Follow the steps below, here is the easiest way to install Laravel on Ubuntu:
1. Install Apache Web Server
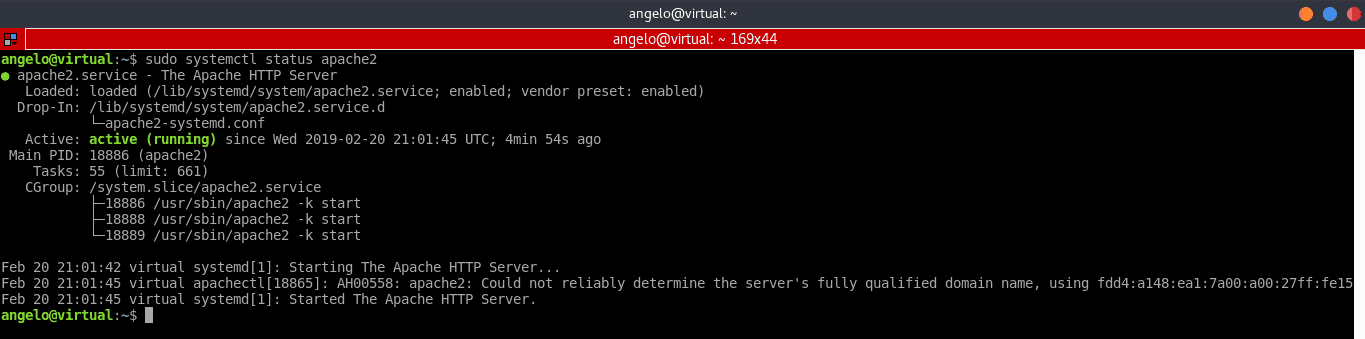
For Laravel to work, you need Apache. This is one of the most popular HTTP server platforms, so it's likely that your VPS is already installed. Luckily you can test this easily! When connecting to the server using SSH, verify that there is an Apache system service there. To verify, we have to run this command.
sudo systemctl status apache2
As you can see, on our VPS there is no Apache service, so we have to install it. To install, execute the following command.
sudo apt install apache2
Ubuntu by default starts the Apache service and makes it start during system load.
Now, if you use a firewall, you need to set up a rule in the Firewall so that Apache can run smoothly. If you do not have a firewall installed, please skip this step.
sudo ufw allow “Apache Full”
Then we can check the Apache service status again.
sudo systemctl status apache2
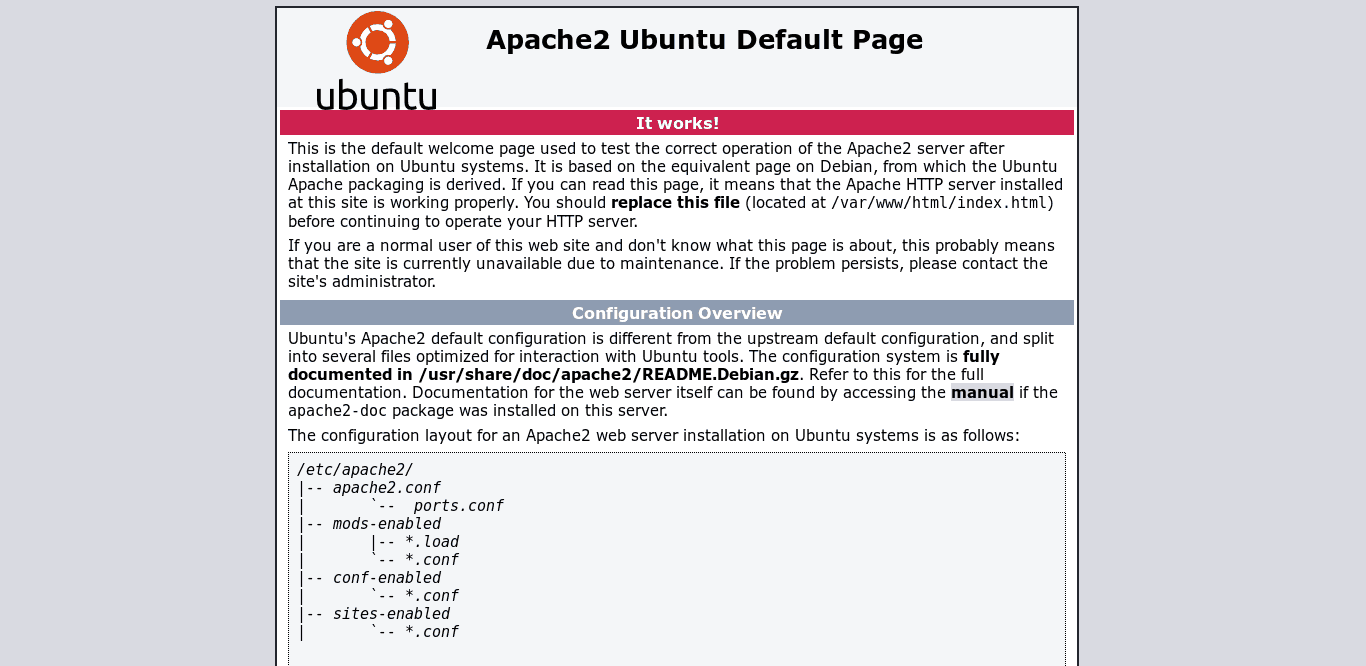
Finally, open a web browser and we will go to the server's IP address or its domain name.
If you see this screen, Apache is up and running.
2. Install PHP
The next step is to install PHP. Fortunately, PHP 7 is included in the official Ubuntu respiratory system by default, making installation a breeze. You need to install the language and some additional modules. To do this, execute the following command:
sudo apt install php libapache2-mod-php php-mbstring php-xmlrpc php-soap php-gd php-xml php-cli php-zip php-bcmath php-tokenizer php-json php-pear
If the following command produces output, stating that some package is not found, simply update your Ubuntu by running the following command and running the previous package again:
apt-get update
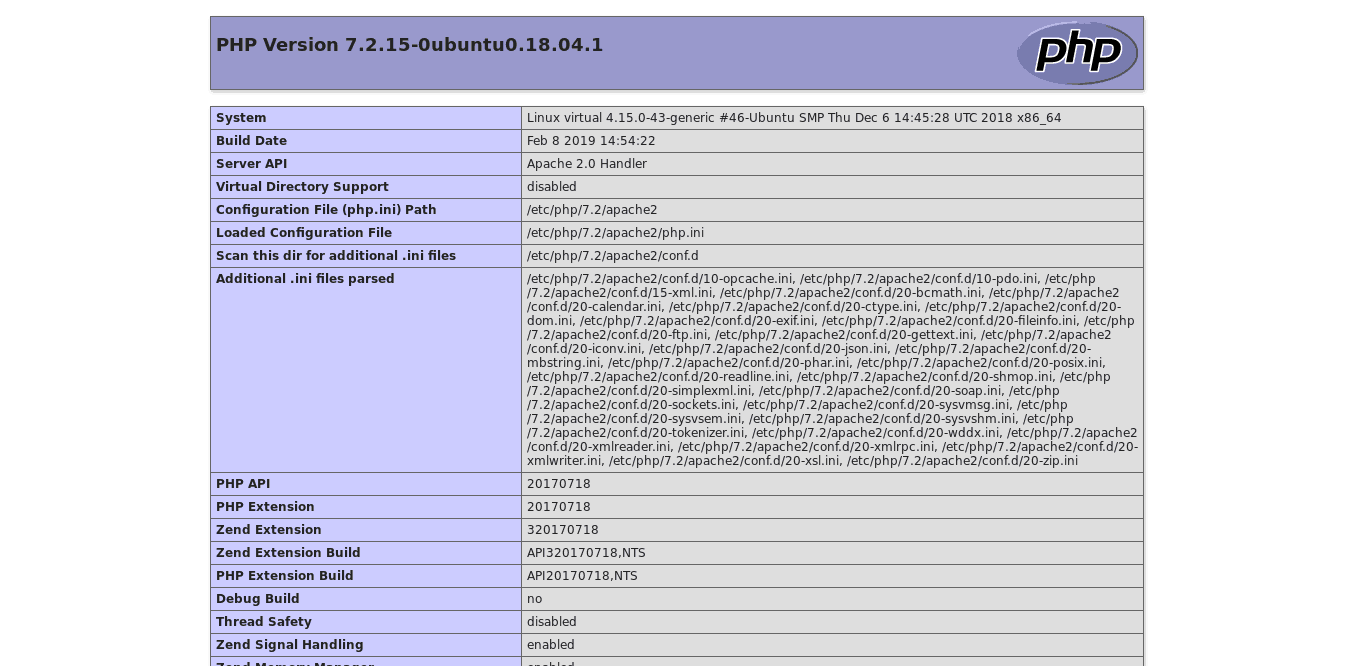
Now, we can check if PHP is working correctly. To test, we need to create a file in the root folder of Apache. Let's call test.php. Run the following command:
sudo nano /var/www/html/test.php
And call the phpinfo function.
<?php

phpinfo();

?>
We have to save and close it. To save, press CTRL + O and to exit press CTRL + X. Then, open a web browser and go to http://Your-serverIP/test.php.
If you see this screen, you can be sure that PHP is working properly.
3. Download and install Database Manager
If you are going to develop project using Laravel in Ubuntu 18.04, then you need to install database manager. Laravel supports PostgreSQL, MySQL, MariaDB, SQLite and SQL server. We can install and configure whatever we want. For this tutorial, we will install MariaDB.
sudo apt install mariadb-server
Then you can set a password for root. To set, you need to use the script mysql_secure_installation. Remember that this step is optional, but is still recommended for security reasons.
sudo mysql_secure_installation
After specifying the password for root, we will be asked some questions about the MariaDB configuration. The answers you should enter are next to the lines of code:
Remove anonymous users? [Y/n] y

Disallow root login remotely? [Y/n] n

Remove test database and access to it? [Y/n] y

Reload privilege tables now? [Y/n] y
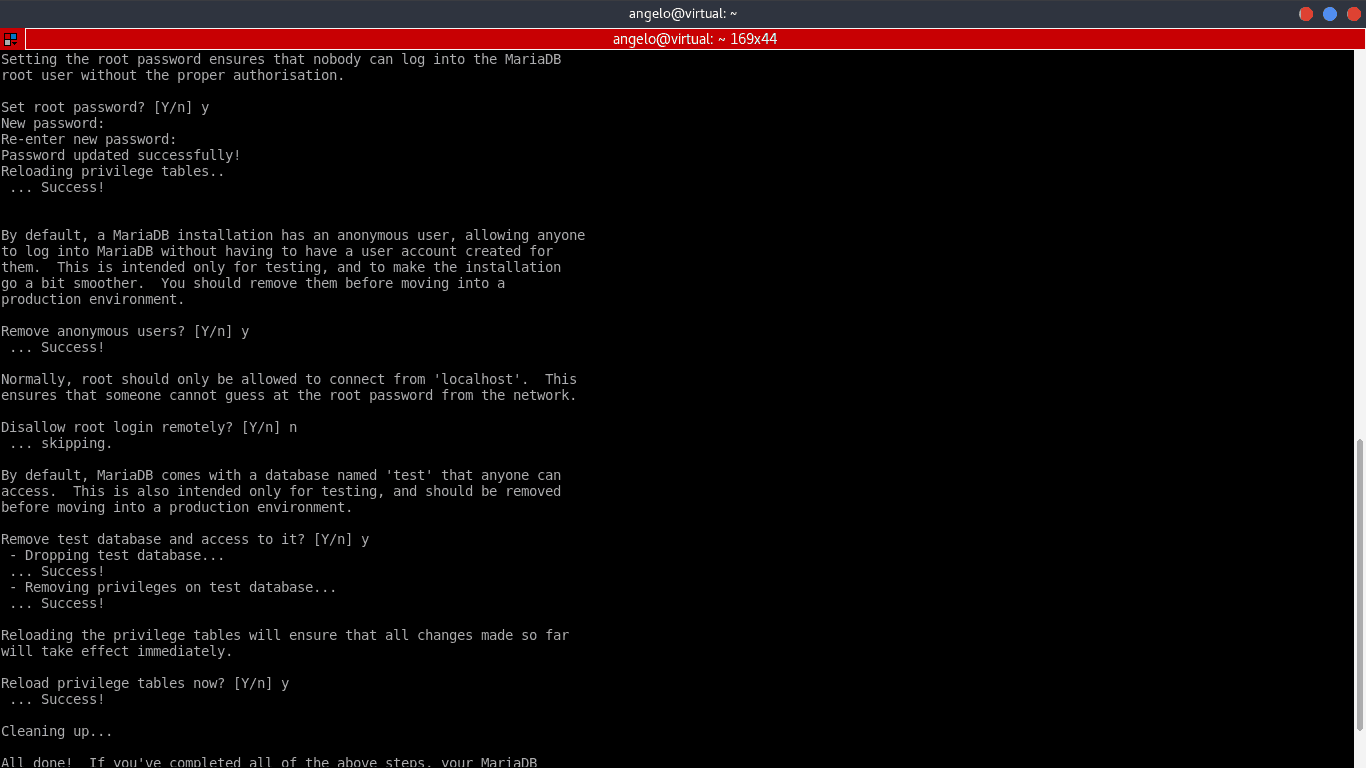
Congratulations, MariaDB has been installed successfully.
4. Install Composer
Composer is a PHP dependency manager that facilitates the download of PHP libraries in projects. Composer both works great and makes installing Laravel much easier.
First, we need to download Composer.
curl -sS https://getcomposer.org/installer | php
Next, we have to make sure Composer can be used globally and make it executable. The following commands will take care of that.
sudo mv composer.phar /usr/local/bin/composer

sudo chmod +x /usr/local/bin/composer
5. Install Laravel on Ubuntu Using Composer
With composer installed, we can now install Laravel. To install, run the following command:
composer create-project --prefer-dist laravel/laravel [project_name]
Of course, you have to replace [project_name] with your application name. In this case, we set project as an example.
Using Laravel for in-house development
To develop applications internally (on local), we can use PHP and specify the host and port of the server. To do this, follow the commands and replace [IP] with your server IP and [port] with the port you want to use.
cd example

php artisan serve --host=[IP] --port=[port]
Next, open your web browser and go to the server's IP address or the specified domain name and port. The address will look like the one shown in the output above. If you see the screen below in your browser, you are ready to start working with Laravel.
Using Laravel to Deploy the Application
On the contrary, if we are going to use VPS as server of Laravel application, then we have to make some adjustments to avoid problems.
First, we need to move the previously created project directory to the Apache root directory. Remember, in our case, the folder name is Example. Follow the following command:
sudo mv example /var/www/html/
Then set the necessary permissions to make sure the project runs smoothly:
sudo chgrp -R www-data /var/www/html/example/

sudo chmod -R 775 /var/www/html/example/storage
It is necessary to create a new virtual host for the project. You can do it easily with the commands below:
cd /etc/apache2/sites-available

sudo nano laravel_project.conf
Add here to create new Virtual Host. Remember instead thedomain.com is equal to IP address your server.
<VirtualHost *:80>
   ServerName thedomain.com
   ServerAdmin webmaster@thedomain.com
   DocumentRoot /var/www/html/example/public

   <Directory /var/www/html/example>
       AllowOverride All
   </Directory>
   ErrorLog ${APACHE_LOG_DIR}/error.log
   CustomLog ${APACHE_LOG_DIR}/access.log combined
</VirtualHost>
Save the file and close it.
Then, disable the default configuration file of Virtual Host in Apache with the following command:
sudo a2dissite 000-default.conf
Then activate the new virtual host:
sudo a2ensite laravel_project
Enable the Apache rewritten module and finally restart the Apache service:
sudo a2enmod rewrite
sudo systemctl restart apache2
Now, open web browser and go to server IP and voila. If you get the same Laravel landing screen you saw last time, you're ready to go.
Now we can work with this amazing PHP framework.
Uninstall Laravel and Composer
To uninstall Laravel we just need to delete the folder of the created project. In the case of Composer, executing the following command is enough:
sudo rm /usr/local/bin/composer
It is done. Laravel has been removed from your VPS.
Epilogue
To develop quality web applications, you need a feature-rich PHP framework. Laravel is one of them. Here you have learned how to install it on your computer or server with Ubuntu 18.04.
Remember, it is wise to consult the official documentation, if you want more information or want to learn more about the project. Good luck with your Laravel installation and programming success!

Hai G. is an expert in managing and operating website services. He has many years of experience in VPS, Hosting, technical SEO, CMS. Especially love WordPress and have been using it for over 5 years now. His hobbies are reading, blogging, traveling and mentoring young people to start a business.


")
 Haven't Tried")


Post a Comment
Post a Comment