WordPress Toolkit is a comprehensive management suite for WordPress integrated in BKNS Hosting Cpanel, with WordPress Toolkit you can easily install and manage WordPress easily with just 1 click. In addition, you can manage multiple WordPress websites at the same time.
1. Access WordPress Toolkit on Cpanel
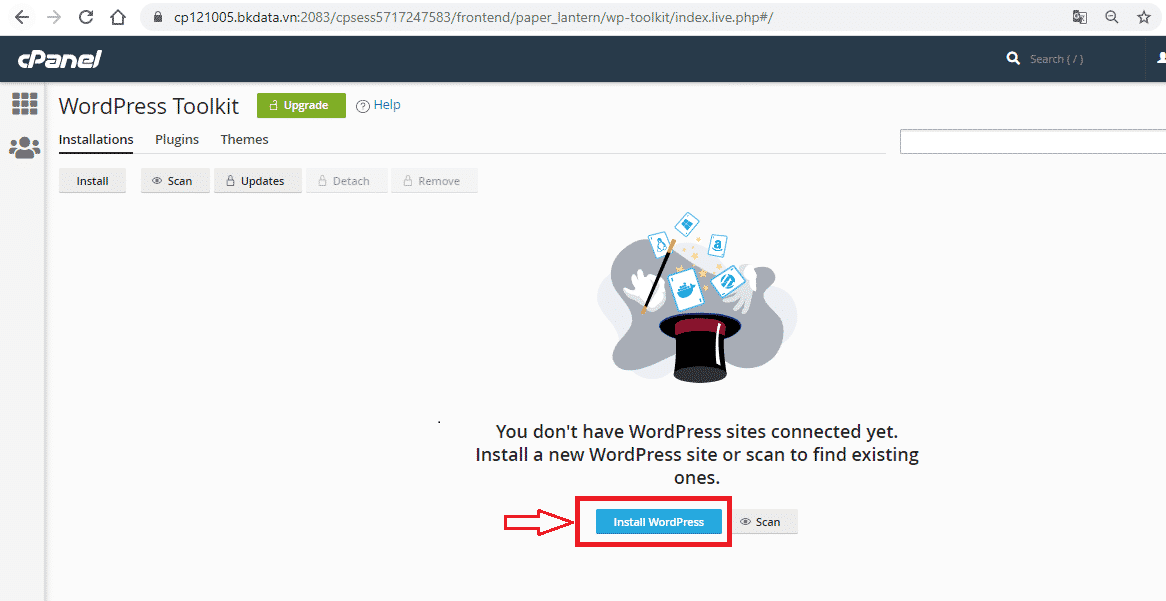
– You access the hosting then navigate to Tab Application → WordPress Toolkit.

2. WordPress Toolkit Features on Cpanel: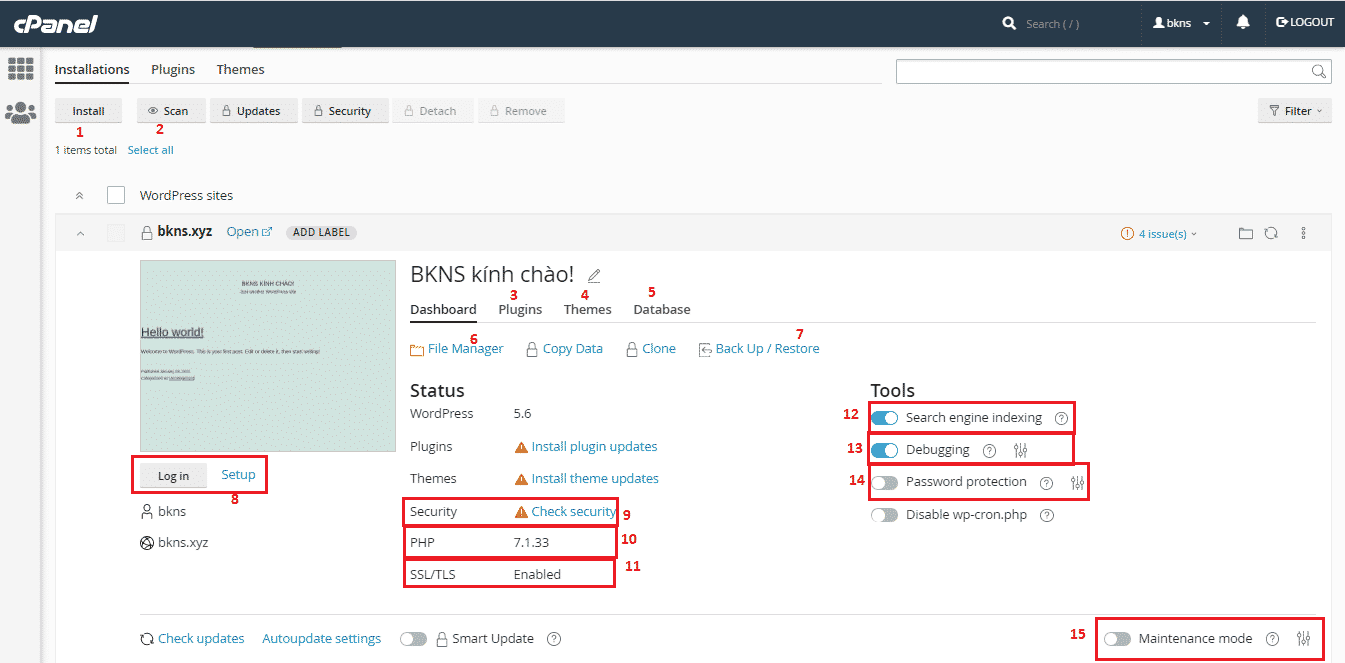
2.1. Install: Install
 This allows you to install WordPress and set up the following:
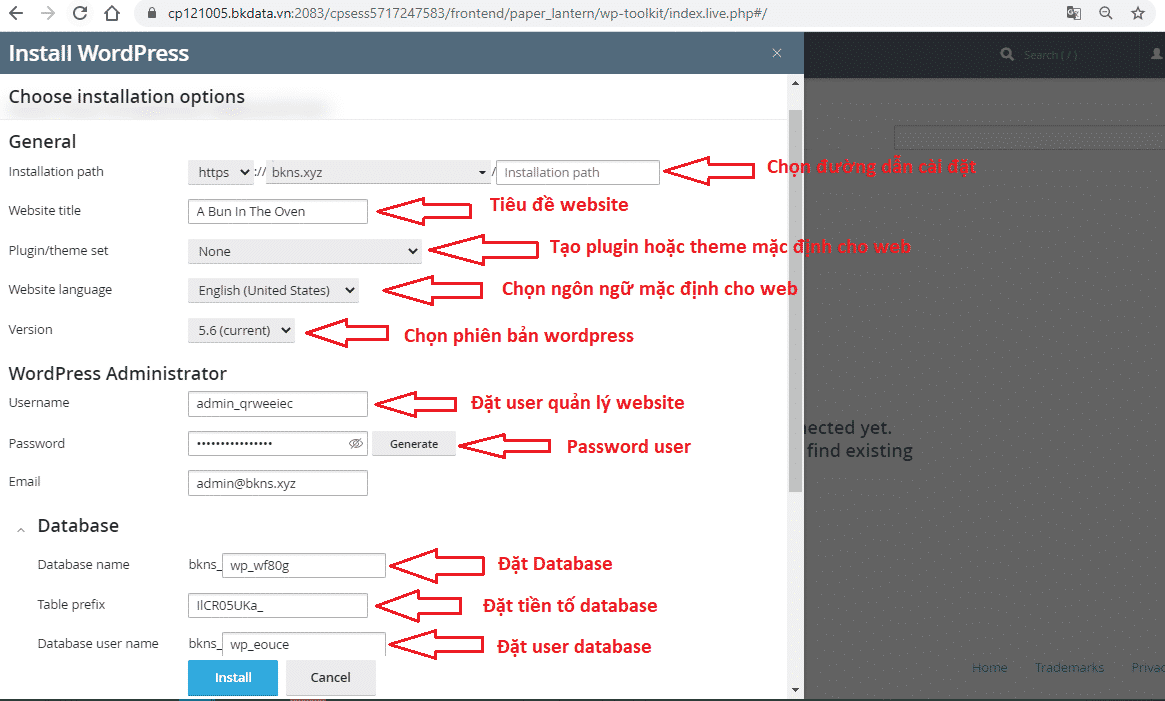 – General: Configuration overview
• Installation path: The path for your website.
• Version: Select the version for WordPress.
• Website title: Tên website.
• Website language: Language for WordPress interface.
– WordPress Administrator: Configure the administrator account
• Username and Password: Account information and password.
• Email: Admin email.
Note: When creating a password, you must ensure that the password is created with high security (Password length over 8 characters, uppercase, lowercase, special characters, digits). You can also use the Generate button so that the system can randomly generate a password for you and then you click on the icon in the password box to be able to display the Password that the system generated so you can store the information. believe Password.
– Database: Database of Website
• Database name: Tên database.
• Database user name / Password: The account and password of the database.
Note: When creating a password, you must ensure that the password is created with high security (Password length over 8 characters, uppercase, lowercase, special characters, digits). You can also use the Generate button so that the system can randomly generate a password for you and then you click on the icon in the password box to be able to display the Password that the system generated so you can store the information. believe Password.
– Automatic Update Settings: Cập nhật WordPress
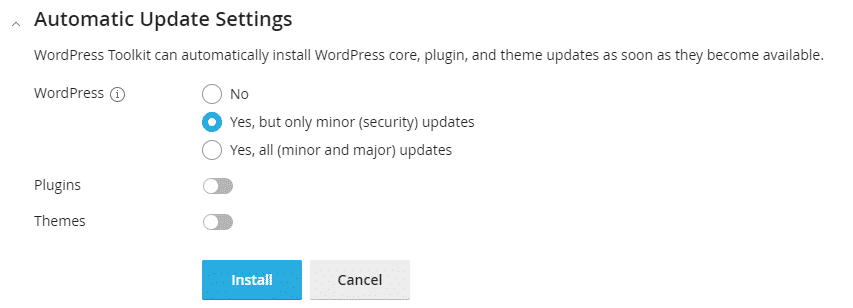
It is important to update WordPress to the latest version, this helps to fix errors in the system and experience new features, and the update process is fully automatic.
• No: Not updated.
• Minor (security) updates: Update slowly, with small steps. (Minor and major) updates: Upgrade to all versions.
• Plugins: Automatically update plugins.
Insecure plugins are always the cause of hacked or infected websites. So WordPress Toolkit allows to automatically update installed plugins, but this functionality has to be enabled during WordPress installation using WordPress Toolkit.
• Themes: Automatically update the interface.
This feature applies to themes that are already listed in the WordPress repository. If your theme has a new update and it appears in Available Updates, Cpanel will automatically update it.
2.2. Scan:
Scan feature will scan WordPress versions then show at WordPress Toolkit if they are missing in case WordPress was installed manually and not through Cpanel.
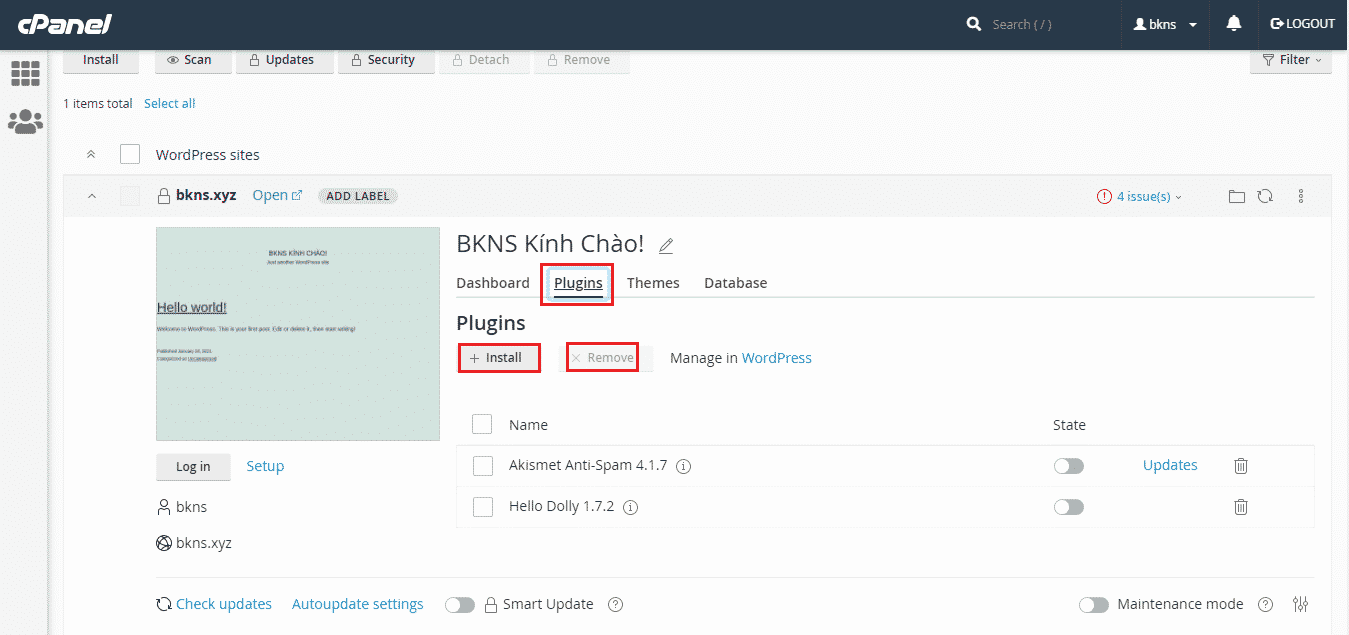
2.3. Plugins:
WordPress Toolkit allows you to manage all the plugins you have installed. You can install new plugins, upload plugins, activate, deactivate and update plugins manually.
2.4. Themes:
Just like the Plugins manager, you can also manage your themes in the WordPress Toolkit. Search and install new themes, upload premium themes, uninstall and update existing themes.

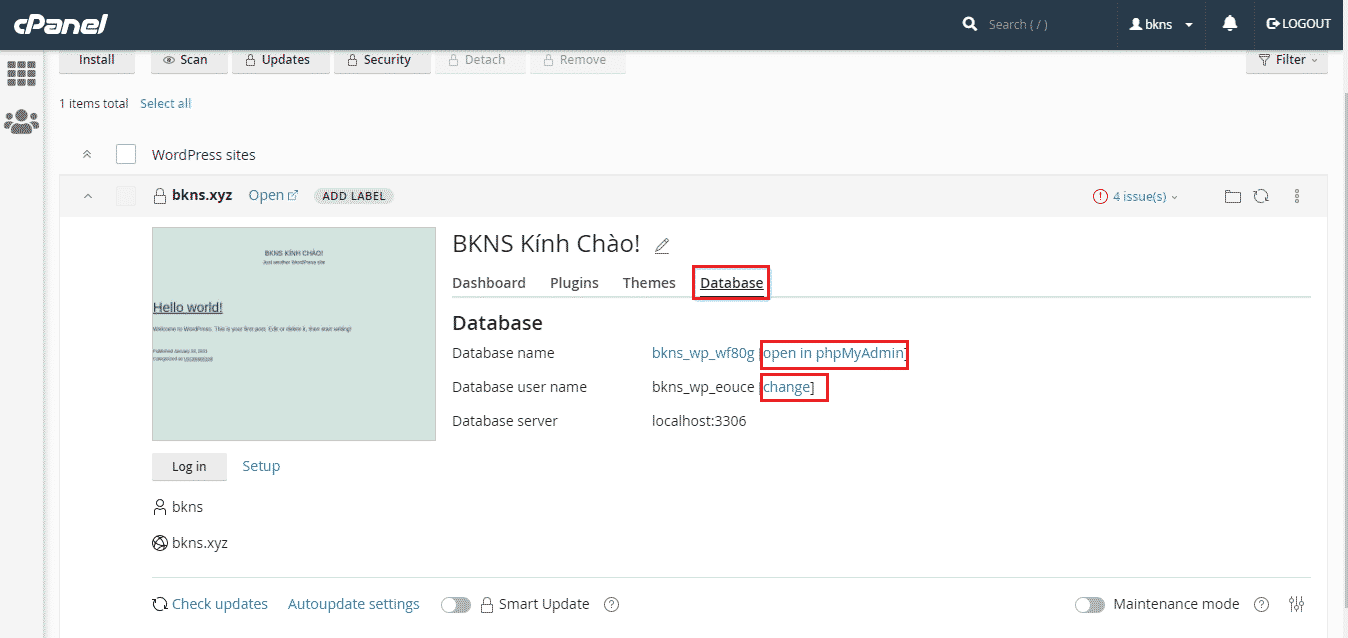
2.5. Databases:
In the Database tab you will see all the information about the database and can make edits to the database username and password and access phpMyAdmin directly.
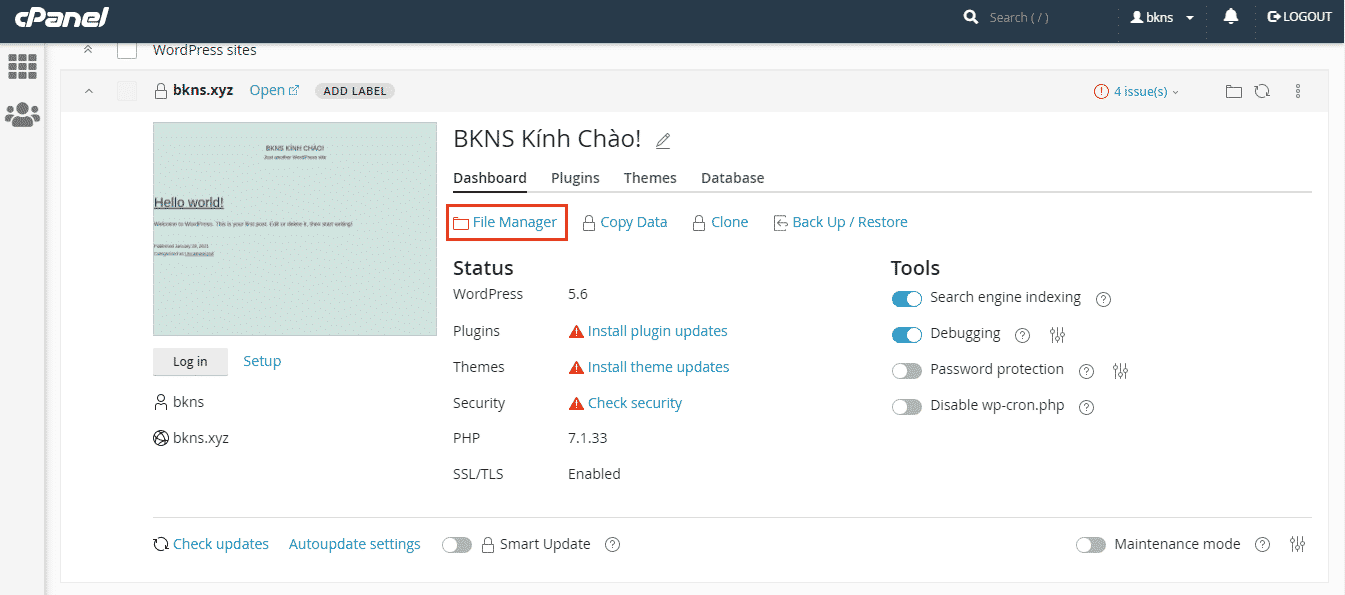
2.6. File Manager:
Allows you to manage all the files on your WordPress website. Here you can create, edit, delete, upload, compress/decompress, move, rename folders, file permissions, etc.

2.7. Backup/Restore:
Allows you to manage and proactively backup / restore data in case the website fails and needs to get back old data information as well as protect your website.


2.8. Login/Setup:
With the WordPress Toolkit, you can access your WordPress dashboard without having to log in. You can also go to Setup to view the administrator account's password and set a new password.

2.9. Security:
With just one click, you can evaluate and find out the entire security hole of the system. At the same time, this tool will also assist in fixing the above holes, if any.
In Security → Check Security to check the security status for WordPress.


2.10. PHP:
Allows you to check the current PHP version you are using for your WordPress.
2.11. SSL/TLS:
To tell guarantee security for website belong to friend, let's history use deliver awake SSL/TLS to code chemical socks chief evil whetheru and truYen evil whetheru qua conclude connect an full. When size anime history use SSL/TLS, status Thai show market “Enabled”
2.12. Search engine indexing:
If you are working on a staging site and don't want search engines to index your website's content, disable this feature. If your staging site is indexed by Googlebot, your main site may be penalized for duplicate content.
Disabling this enables the “Discourage search engines from indexing this website” option in WordPress, from there, add the “noindex, nofollow” tag to your website title and add the Disallow directive to the robots.txt file.
2.13. Debugging:
Handling errors of a website is quite difficult, complicated and risky. Therefore, the software supports users to copy from the main website to a test website and check for errors on this website with various tools.
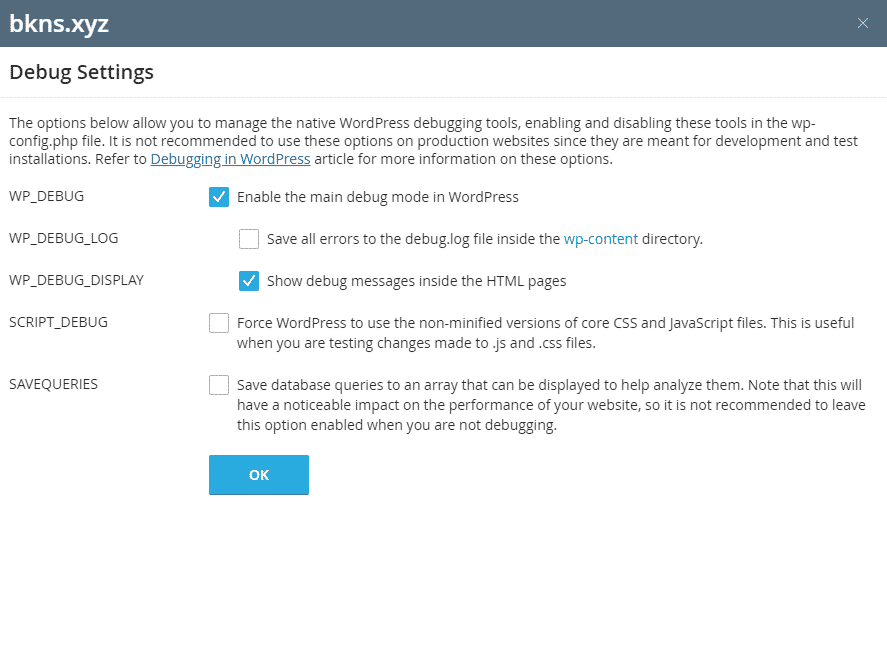
Enable debugging configuration of website errors so that administrators can easily see and fix them (you can configure more details in the setup section).
Normally Debugging in WordPress involves manually editing the wp_config and setting the debug constant: WP_DEBUG. SCRIPT_DEBUG and SAVE_QUERIES. However, with the WordPress Toolkit, you can configure the Debug.

The options in the Settings section allow you to manage the native WordPress debugging tools enabled in the wp-config.php file:
- WP_DEBUG: Enable the main debug mode in WordPress.
- WP_DEBUG_LOG: Save all errors to the debug.log file inside the wp-content folder.
- WP_DEBUG_DISPLAY: Display debug messages inside HTML pages.
- SCRIPT_DEBUG: Force WordPress to use unminified versions of core CSS and JavaScript files. This is useful when you are testing changes made to .js and .css files.
- SAVEQUERIES: Saves database queries to an array that can be displayed to help analyze them. Note: this will have a noticeable impact on your website's performance, so it's not recommended to leave this option enabled when you're not debugging.
2.14. Password Protection:
If you need to limit access to your website and require all visitors to provide a username and password, enable the Password protection option. This should be used for development sites that have been cloned into a staging site. Or if you are building a new WordPress website and don't want to go public yet. This will also stop search engine crawlers from indexing the website.

After setting up Password protection, users will be asked to login user and password when accessing.
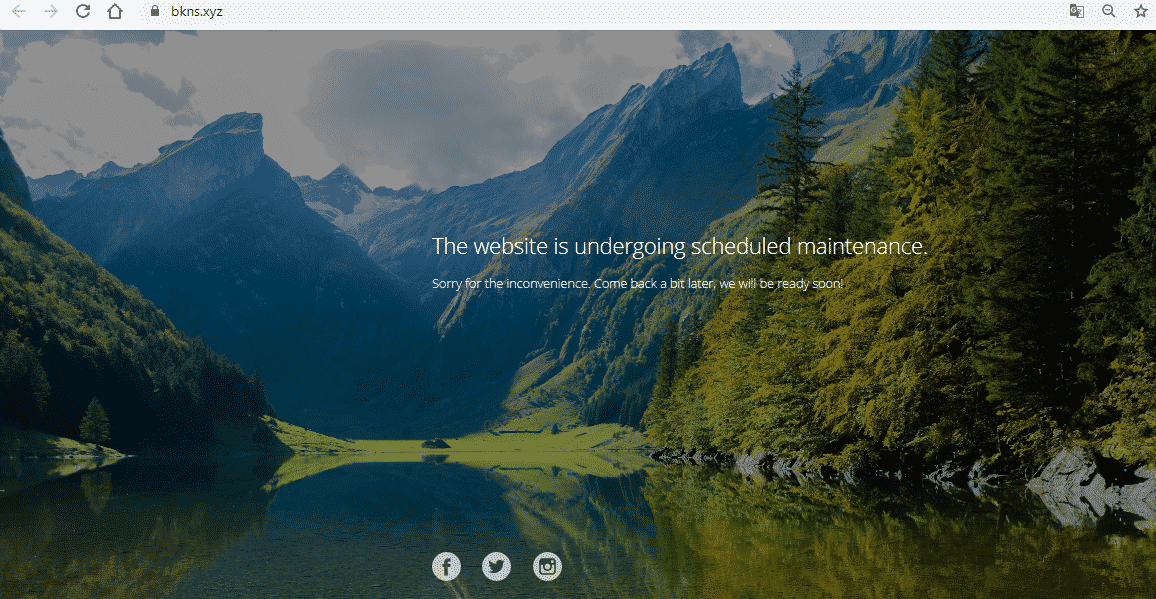
2.15. Maintenance mofrom:
Enable the website to go into maintenance mode instead of using a plugin on WordPress. When a WordPress website is in maintenance mode, its content is hidden from visitors without being changed or otherwise affected.

After turning on Maintenance mode, your website will display the following interface:
This is an overview of all the functions in the WordPress Toolkit. Hope this article will help you in the process of learning and using WordPress Toolkit. Good luck!
Hoangtd


")
 Haven't Tried")


Post a Comment
Post a Comment